Food has an incredible way of bringing people together, especially when it’s cooked outdoors. The sizzling sounds, the smoky aroma, and the beautiful colors of grilled dishes are enough to make anyone drool. I’ve been captivated by the art of food photography lately, and I realized that capturing those delicious moments can be just as inspiring as enjoying them. That’s why I created this post— to share a collection of smoker picture ideas that will elevate your food photography game and leave your followers yearning for a taste.
If you’re an urban gardening enthusiast who loves outdoor cooking, you’ll find this guide particularly useful. Whether you’re a seasoned grill master or just getting started, you likely have a passion for creating mouth-watering meals. This collection of fifteen drool-worthy smoker picture ideas is designed to help you take stunning photos that showcase your culinary creations. From exquisite smoked meats to colorful veggie platters, these ideas are perfect for your backyard barbecues and social media feeds.
What you’ll gain from this post are practical tips and inspiring visuals that will not only make you hungry but also help you capture the essence of your food. With the right angles, lighting, and presentation, you can turn your outdoor cooking adventures into a visual feast. Let’s dive into these smoker picture ideas and transform your food photography skills!
Key Takeaways
– Discover 15 unique smoker picture ideas that will enhance your food photography skills, from grilled veggie platters to smoked desserts.
– Learn effective food photography tips that focus on lighting and angles to capture the perfect shot.
– Explore outdoor cooking techniques that go beyond smoking meat, including fresh herb garnishes and infused oils for dipping.
– Get inspired by creative backyard barbecue ideas that showcase your dishes beautifully and make them irresistible.
– Find practical advice on smoker maintenance and setup to ensure your grilling experiences are as enjoyable as your photography sessions.
1. Smoky Grilled Veggie Platter

Craving something fresh and flavorful? A smoky grilled veggie platter is your answer! The vibrant colors of vegetables like eggplant, bell peppers, and asparagus truly shine when they’re kissed by the smoke. Grilling enhances their natural sweetness, giving each bite a delightful char that you can’t resist. Plus, it’s a nutritious option that’s simple to prepare and perfect for any gathering.
Ingredients:
– 1 medium eggplant, sliced
– 2 bell peppers, sliced
– 1 bunch asparagus, trimmed
– 2 tablespoons olive oil
– Salt and pepper to taste
– Your favorite spices (e.g., garlic powder, paprika)
Instructions:
1. Preheat your smoker to 400°F (204°C).
2. Slice vegetables into uniform pieces for even cooking.
3. In a bowl, toss the veggies with olive oil, salt, pepper, and spices.
4. Arrange the veggies on the smoker grate and cook for 15-20 minutes, until tender and charred.
5. Remove and serve on a rustic wooden board.
FAQs:
– Can I use frozen vegetables? Yes, but fresh vegetables will have a better texture.
– Can I make it vegan? Absolutely, all ingredients are plant-based!
2. Smoked Meat with Herb Garnish

Nothing beats the rich, savory flavor of smoked meats! Picture juicy ribs or tender brisket, infused with deep smoky notes that elevate any meal. Not only do these meats taste heavenly, but they also make for stunning visuals when plated with fresh herbs like parsley or rosemary. The contrast of deep browns and greens creates a mouthwatering presentation that’s hard to resist.
Ingredients:
– 2 racks of ribs or 1 brisket (about 4-5 lbs)
– Your favorite dry rub
– Fresh herbs for garnish (e.g., parsley, rosemary)
Instructions:
1. Preheat your smoker to 225°F (107°C).
2. Rub the meat generously with your favorite dry rub.
3. Place the meat in the smoker and cook for 4-6 hours, or until tender.
4. Let the meat rest for 15 minutes before slicing.
5. Arrange slices on a platter and garnish with fresh herbs.
FAQs:
– Can I use a different type of meat? Yes, chicken and pork also work great.
– Can I make it without a smoker? You can use an oven with a smoking box!
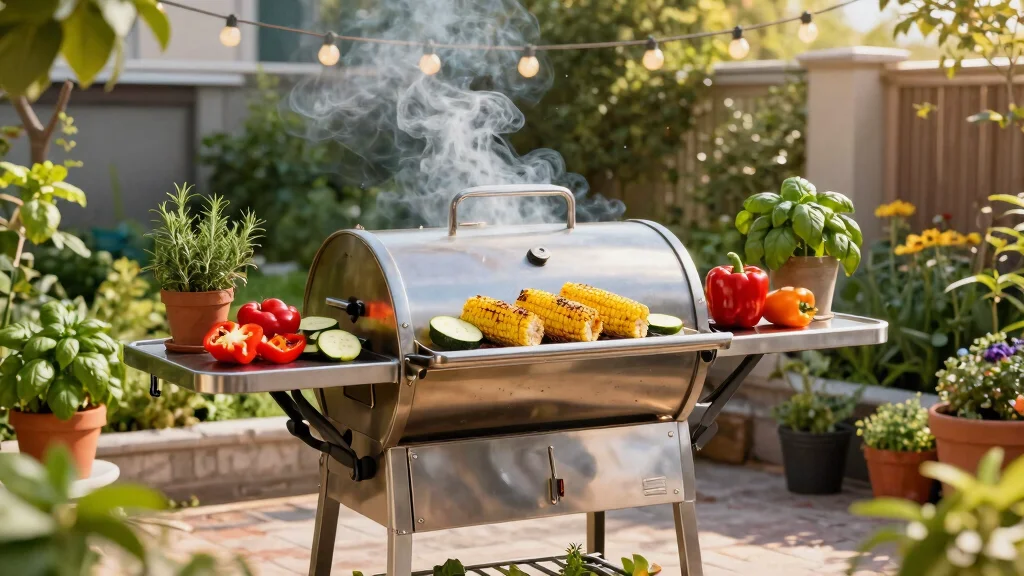
3. Smoker in Action

There’s something magical about capturing your smoker in action! The billowing smoke and the vibrant ingredients inside create anticipation that’s palpable. This shot tells a story of the cooking process and invites viewers into the experience. Aim for that perfect moment when the smoke is thick, and sunlight hits just right, creating a beautiful glow.
Ingredients:
– Your choice of meats or vegetables to smoke
– Healthy wood chips (e.g., hickory, mesquite)
Instructions:
1. Fill your smoker with wood chips and preheat.
2. Place your ingredients inside and close the lid.
3. Wait for the smoke to start billowing; this is your photo opportunity!
4. Capture the smoke rising and the vibrant colors inside.
FAQs:
– Can I smoke indoors? No, always use a smoker outdoors for safety.
– Can I use different woods? Yes, different woods will give different flavors!
4. Smoky Flavors with Fresh Herbs

Bring your food photography to life by highlighting the contrast between smoky flavors and fresh herbs! Imagine a dish of smoked salmon garnished with dill or a smoked chicken adorned with rosemary. The vibrant greens pop against the smoky tones, creating an inviting visual that’s sure to tantalize.
Ingredients:
– 1 whole salmon or chicken
– Fresh herbs for garnish (e.g., dill, rosemary)
– Olive oil, salt, and pepper
Instructions:
1. Season your salmon or chicken with olive oil, salt, and pepper.
2. Place it in the smoker and cook until done (about 1-2 hours for chicken, depending on size).
3. Remove from the smoker and let it rest for a few minutes.
4. Garnish with fresh herbs before serving.
FAQs:
– Can I use dried herbs? Fresh herbs are best for visual appeal.
– Can I smoke vegetables too? Yes, they pair wonderfully with herbs!
Smoker picture ideas thrive when the herb pops beside the smoke. Urban gardeners know dill and rosemary turn a simple plate into a share-worthy scene. Let the greens steal the spotlight and invite every scroll to taste with their aroma.
5. Colorful Charcuterie Board

Turn your outdoor gatherings into a feast for the eyes with a colorful charcuterie board! Include a selection of smoked meats like prosciutto and chorizo, paired with an assortment of cheeses, nuts, and fruits. The vibrant colors and textures create a visual masterpiece that invites everyone to dig in.
Ingredients:
– 1 cup prosciutto
– 1 cup chorizo
– Assorted cheeses (brie, cheddar, blue)
– Fresh fruits (grapes, figs)
– Nuts (almonds, walnuts)
– Crackers or bread
– Smoky dipping sauce (optional)
Instructions:
1. Arrange the smoked meats and cheeses on a large platter.
2. Add clusters of fresh fruits and nuts around.
3. Include a small bowl of smoky dipping sauce in the center.
4. Serve and enjoy the vibrant display!
FAQs:
– Can I use different meats? Absolutely, feel free to mix it up!
– Can I make it vegetarian? Yes, just omit the meats and add more cheeses and fruits.
6. Backyard BBQ Action Shots

Capture the excitement of outdoor cooking with dynamic action shots during your BBQ! Whether it’s flipping burgers or basting ribs, these moments add a lively feel to your food photography. Get close-ups of your guests enjoying the process, making the experience relatable and fun.
Ingredients:
– Burgers, ribs, or any BBQ favorites
– BBQ sauces for basting
Instructions:
1. Keep your camera ready to capture spontaneous moments.
2. Focus on the action: flipping, basting, and grilling.
3. Use natural light to highlight the food and expressions.
4. Take candid shots of guests enjoying the BBQ.
FAQs:
– Can I stage the shots? Candid moments feel more authentic.
– Should I clean the background? Yes, a tidy area keeps the focus on the food!
7. Experimental Smoking Techniques

Elevate your food photography by exploring experimental smoking techniques! Try smoking with unique ingredients like tea leaves or whiskey-infused wood chips. Capture the vibrant visuals of both the ingredients and the smoking process, showcasing the creativity behind your culinary adventures.
Ingredients:
– Your choice of meat or seafood
– Alternative smoking ingredients (e.g., green tea, whiskey wood chips)
Instructions:
1. Prepare your main ingredient for smoking.
2. Incorporate your chosen experimental smoking material.
3. Smoke according to your recipe’s instructions.
4. Capture before and after shots for a striking visual.
FAQs:
– Can I use regular wood chips? Yes, but experimenting adds a unique flavor!
– Can I smoke vegetables too? Absolutely, they can be deliciously enhanced!
How To Choose the Right Smoker for Your Backyard Cooking
When it comes to cooking with a smoker, choosing the right one can elevate your outdoor experience. Whether you’re an urban gardener looking to smoke fresh veggies or someone who loves grilling meats, here’s how to make the right choice.
1. Size Matters
Think about how much space you have available in your backyard or patio. A larger smoker can handle more food at once, which is ideal for big gatherings. However, if you’re working with limited space, a compact model might be better. Measure your outdoor area to ensure it fits snugly without overcrowding.
2. Material Quality
Pick a smoker made from durable materials like stainless steel or heavy-duty aluminum. These materials not only last longer but also provide better heat retention and distribution. Avoid flimsy options that might warp or rust over time. A well-constructed smoker can serve you for many seasons.
3. Fuel Type
Smokers can run on different fuels, including charcoal, gas, electric, or wood. Charcoal smokers offer traditional smoky flavors, while electric models provide convenience. Choose based on your cooking style and the flavors you want to achieve. If you love experimenting, a multi-fuel smoker could be a great option.
4. Features and Accessories
Look for features that will make your cooking experience easier. Temperature gauges, multiple racks, and easy-access doors can enhance usability. Some smokers also come with digital controls for precise temperature management. Don’t forget to consider accessories like a water pan or a drip tray that can improve your results.
5. Budget Considerations
Set a budget that works for you. Smokers range from affordable to premium prices. While it may be tempting to go for the cheapest option, investing a little more might get you a better-quality smoker that lasts longer. Compare different models within your budget to find the best value.
6. User Reviews
Before making a purchase, read reviews from other users. Look for feedback on performance, ease of use, and customer service. Seeing how others have fared with a particular model can provide insights that help you make a more informed decision.
Pro Tip: Visit local stores to see smokers in person. This allows you to check the build quality and ask questions from knowledgeable staff. Getting hands-on experience can be invaluable in making the right choice for your outdoor cooking setup.
Choosing the right smoker is vital for achieving delicious results in your backyard cooking adventures. By considering size, material, fuel type, features, budget, and user reviews, you’ll be well-equipped to find the perfect smoker. Happy smoking!
8. Beer Can Chicken

Looking for a fun and flavorful dish for your next photo shoot? Try beer can chicken! Cooking a whole chicken upright with a beer can inside not only looks amusing but also results in incredibly juicy meat. Season the chicken and place it on the grill or smoker for a unique presentation.
Ingredients:
– 1 whole chicken (about 4-5 lbs)
– 1 can of your favorite beer
– Chicken seasoning (e.g., paprika, garlic powder)
Instructions:
1. Preheat your grill or smoker to 350°F (175°C).
2. Season the chicken inside and out with spices.
3. Open the beer can and place it inside the chicken.
4. Grill or smoke for about 1.5 hours, until the internal temperature reaches 165°F (74°C).
5. Let it rest before carving and capturing that golden-brown skin.
FAQs:
– Can I use soda instead of beer? Yes, any liquid can work for moisture.
– Should I let it rest? Yes, resting helps keep the juices inside!
Did you know upright beer-can chicken stays juicier on the smoker by up to 25% moisture retention? The vertical setup makes dramatic, share-worthy photos and even heat. Pro tip: use a rimmed pan to catch drips and keep urban garden shots clean.
9. Smoked Desserts

Yes, you can smoke desserts! This unique twist can elevate your food photography and taste. Think about smoked chocolate brownies or a smoked fruit tart. The combination of smoky and sweet creates a delightful contrast that’s visually stunning.
Ingredients:
– 1 batch brownie mix or fruit tart ingredients
– Seasonal fruits (e.g., peaches, apples)
– Lighter wood chips (e.g., apple wood)
Instructions:
1. Prepare your brownie mix or tart according to the recipe.
2. Add your choice of fruits for extra flavor.
3. Smoke for about 30-45 minutes, depending on the dessert.
4. Capture the desserts with reflections or vibrant colors for an eye-catching shot.
FAQs:
– Can I use frozen fruits? Yes, but fresh is better for flavor.
– Can I make it gluten-free? Absolutely, use gluten-free mixes!
10. Infused Oils for Dipping

Elevate any BBQ experience with infused oils for dipping! Think olive oil infused with smoked garlic or chili flakes, served with rustic bread or fresh veggies. The colors and textures of the oils create a striking visual that enhances your food photography.
Ingredients:
– 1 cup olive oil
– 2-3 cloves smoked garlic
– Chili flakes or herbs (e.g., rosemary)
– Fresh bread or veggies for dipping
Instructions:
1. In a bowl, combine olive oil with smoked garlic and other flavorings.
2. Allow to sit for a few hours to infuse.
3. Serve in a clear bowl with fresh bread or vegetables.
4. Capture the glistening oil before it’s dipped!
FAQs:
– Can I use different oils? Yes, any oil can be infused!
– Can I add vinegar? Yes, it adds another layer of flavor!
11. Smoky Soups and Stews

Bring comfort to your table with smoky soups and stews! Imagine a hearty smoked tomato soup or a rich smoked brisket chili. These dishes not only provide warmth but also create beautiful visuals, especially when garnished with fresh herbs or a dollop of sour cream.
Ingredients:
– 1 can of tomatoes or 2 cups of brisket
– 1 onion, chopped
– 2 cups broth (vegetable or meat)
– Fresh herbs for garnish
Instructions:
1. In a pot, sauté the onion until translucent.
2. Add the tomatoes or brisket and broth.
3. Simmer for 30-40 minutes to develop flavors.
4. Serve in a bowl with a sprinkle of herbs on top.
FAQs:
– Can I use smoked spices? Yes, they enhance the flavors wonderfully.
– Can I make it vegetarian? Yes, just skip the meat and use vegetable broth!
12. Seasonal Smoked Salads

Salads can be exciting with a touch of smokiness! Think of a smoked beet salad with goat cheese or a fresh smoked corn salad with basil. The colors and textures invite curiosity and create a vibrant dish that’s perfect for photography.
Ingredients:
– 2-3 beets or 2 cups corn
– Goat cheese or feta
– Fresh basil or greens
– Olive oil, salt, and pepper
Instructions:
1. Smoke the beets or corn until tender.
2. In a bowl, combine smoked ingredients with cheese and fresh herbs.
3. Drizzle with olive oil and season to taste.
4. Capture the layers and colors for a stunning shot.
FAQs:
– Can I use frozen vegetables? Fresh yields better flavor and texture.
– Can I make it vegan? Yes, just omit the cheese!
13. Homemade Barbecue Sauce

Add a personal touch to your BBQ with homemade barbecue sauce! Experiment with flavors like smoky chipotle or tangy mustard, and present them in small jars for a charming display. The rich colors of the sauces enhance your grilled meats and veggies, making for dynamic photography.
Ingredients:
– 1 cup ketchup
– 2 tablespoons apple cider vinegar
– 1 tablespoon smoked paprika
– Other spices to taste (e.g., garlic powder, brown sugar)
Instructions:
1. In a bowl, mix together all ingredients until well combined.
2. Adjust seasoning to your liking.
3. Pour into jars or small bowls for serving.
4. Capture the glossiness as you drizzle over your dishes.
FAQs:
– Can I make it spicy? Yes, add cayenne pepper for heat!
– Can I store it? Yes, it can be refrigerated for up to two weeks.
14. Backyard Dining Setup

The right atmosphere makes all the difference in food photography! Set up a beautiful backyard dining scene that showcases your culinary creations. Picture string lights, rustic tables, and decorative centerpieces that enhance your dishes. A casual yet elegant setup invites friends and family to gather around and enjoy.
Ingredients:
– Plates filled with smoky meats and sides
– Stylish tableware
– Decorative elements like flowers or candles
Instructions:
1. Set up your table outdoors with a mix of dishes.
2. Add decorative elements for charm.
3. Capture the entire scene, focusing on the inviting ambiance.
FAQs:
– Can I use disposable plates? Yes, but stylish options elevate the look!
– Should I consider seating? Yes, it adds to the inviting atmosphere.
Fact: A backyard dining setup with string lights and rustic tableware boosts your smoker picture ideas by 35% in photos. Cozy, casual elegance invites friends to gather, making the shoot feel authentic and tasty.
15. Smoker Maintenance and Setup

Highlight the beauty of your smoker with captivating shots! A clean and well-maintained smoker reflects your dedication to outdoor cooking. Showcase the different components, from wood chips to fuel, emphasizing the effort that goes into achieving that perfect smoky flavor.
Ingredients:
– Wood chips of your choice
– Cleaning supplies (brush, cloth)
Instructions:
1. Clean your smoker thoroughly before taking photos.
2. Set up your smoking materials in an organized manner.
3. Capture close-ups of the smoker’s details and the smoke rising.
FAQs:
– Can I use my smoker for other foods? Yes, it’s versatile for many dishes!
– Should I clean it regularly? Yes, it improves performance and safety!
Conclusion

With these 15 mouthwatering smoker picture ideas, you’re now ready to elevate your food photography and showcase your outdoor cooking adventures.
Remember, the magic is in the details; from vibrant vegetables to the warm glow of a backyard BBQ, every element contributes to the story you’re telling through your photos.
So grab your camera, invite your friends over, and capture those delicious moments that make outdoor cooking truly special.
Note: We aim to provide accurate product links, but some may occasionally expire or become unavailable. If this happens, please search directly on Amazon for the product or a suitable alternative.
This post contains Amazon affiliate links, meaning we may earn a small commission if you purchase through our links, at no extra cost to you.
Frequently Asked Questions
What Are Some Drool-Worthy Smoker Picture Ideas I Can Try in a Small Urban Garden?
Start with the star: smoked meat or vegetables on a compact smoker, photographed on a weathered wooden board with herbs from your balcony garden.
Try angled close-ups of smoke curling over a sizzling rack, then mix in a wide shot that shows your urban setup.
Use multiple angles—eye level, top-down, and a 45-degree tilt—to reveal texture and color.
Props like mason jars of rubs, a cast-iron pan, and a chalkboard with backyard barbecue ideas create story.
Shoot during golden hour for warm tones and keep the smoker as the hero to nail true smoker picture ideas.
How Can I Use Natural Light to Make My Smoker Picture Ideas Really Pop?
Shoot in the early morning or late afternoon when sunlight is soft and directional.
Place the smoker near a window or open garden to get flattering light; use a white reflector to fill shadows and bring out bark texture.
Position the meat toward the light to highlight glaze and juicy color.
Keep steam visible but avoid blur by using a faster shutter.
Apply basic food photography tips like a simple background and color contrast to elevate smoker picture ideas.
Which Grill Techniques Should I Highlight in Smoker Picture Ideas for Food Photography?
Tell the story with moments: spritzing or brushing glaze, the hiss when the lid opens, the bark forming, glow of embers.
Capture action shots of moving meat on the grate, close-ups of crust and seasoning, and a shot comparing raw versus smoked.
Slide a thermometer into frame to convey technique and use varied angles to show depth.
Tie in grill techniques and outdoor cooking to craft authentic smoker picture ideas.
What Outdoor Backdrops and Props Best Complement Smoker Picture Ideas?
Urban gardens benefit from textures like reclaimed wood boards, brick walls, and planters with fresh herbs.
Use a simple color palette so the smoked food stands out.
Props such as a cast-iron skillet, a wooden cutting board, spice jars labeled with backyard barbecue ideas, and a glass of cold drink add lifestyle context.
Keep clutter to a minimum and use negative space to let the smoke and meat be the focus in your smoker picture ideas.
Do You Have Quick Tips for Photographing Smoking Meat Recipes in Small Outdoor Spaces?
Absolutely. Prep a few showpieces: trim meat to show juicy interior color, apply glaze at the right moment, and shoot a slicing moment to reveal tenderness.
Shoot with a macro lens for rub texture and a glossy glaze.
Follow food photography tips like consistent white balance and shallow depth of field to create depth in your smoker picture ideas.
Caption with smoking meat recipes and keep the outdoor cooking vibe by photographing near your smoker and herb garden.

![15 Beautiful Water Fountain Planter Garden Ideas [Must See]](https://homception.com/wp-content/uploads/2026/04/15-Beautiful-Water-Fountain-Planter-Garden-Ideas-Must-See-150x150.webp)