Creating a beautiful water fountain can transform your garden into a serene retreat. With the warm seasons just around the corner, I’ve found myself craving those refreshing splashes of water and the calming sounds they bring. If you’re someone who loves gardening and enjoys adding unique touches to your outdoor space, you’re in for a treat. This post is designed just for you.
I’ve gathered a selection of 7 sturdy water fountain base ideas that are perfect for DIY projects. Whether you have limited space or just want to try your hand at something creative, I’ve got you covered. From reclaimed wood to upcycled furniture, these ideas are not only durable but also add a unique flair to any garden setting. You’ll learn practical tips and tricks to help you bring these DIY water fountain bases to life, turning your outdoor area into a tranquil oasis.
Now, let’s dive into these garden fountain designs and discover how you can make your own stunning outdoor water feature.
Key Takeaways
– Explore various materials: Use items like reclaimed wood, concrete blocks, or stone slabs to create durable and eye-catching fountain bases.
– Consider space limitations: Choose designs tailored for small spaces to ensure your fountain fits perfectly in your garden.
– Upcycling is key: Look for furniture or materials around your home that can be repurposed, making your project both eco-friendly and budget-friendly.
– Focus on stability: Ensure the base you choose can support the weight of your fountain and withstand outdoor elements for lasting use.
– Get creative with designs: Mix and match different materials to create a unique fountain base that reflects your personal style and enhances your garden’s beauty.
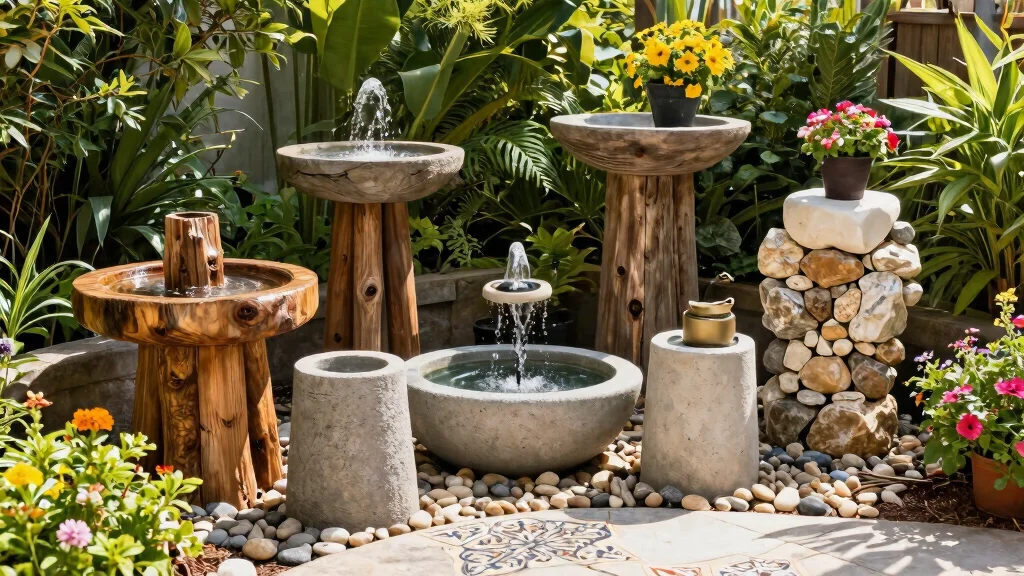
1. Reclaimed Wood Stump Base

Imagine incorporating a reclaimed wood stump as a stunning foundation for your garden fountain. This earthy option not only provides solid support but also infuses your space with a rustic charm. You can easily find stumps at local tree services or use one from your own yard, creating a truly personal touch.
To prepare the stump, hollow out the top for a flat surface, ensuring it’s level for good water flow. Protect the wood using a natural sealant, which enhances its organic look while safeguarding it from the elements.
Benefits of a Reclaimed Wood Stump Base:
– Sustainable: Eco-friendly and easy to source.
– Unique Design: Each stump features its own shape and texture.
– Easy to Customize: Paint, varnish, or leave it in its natural state.
Securely position your fountain on the stump to avoid tipping, and regularly check the water level to maintain smooth operation.
2. Concrete Block Foundation

Looking for a strong and industrial-style base for your fountain? A concrete block foundation is your answer! This option works great for smaller spaces, offering a reliable and sturdy support for various fountain designs.
You can easily stack and arrange the blocks to create a custom height, allowing for creative expression in your garden layout. Leave the blocks raw for an edgy look, or paint them to blend seamlessly with your surroundings.
Advantages of Concrete Block Foundations:
– Durability: Weather-resistant and decay-proof.
– Versatile: Supports multiple fountain styles.
– Easy Installation: Simple assembly without needing special tools.
Ensure the blocks are stable and level to prevent water pooling and to keep your fountain functioning smoothly. Enhance the aesthetic by adding moss or small plants for a softer appearance.
3. Stone Slab Base

A stone slab base offers a classic and timeless foundation for your DIY water fountain. This elegant choice not only enhances the aesthetic of your garden but also provides the stability needed for any water feature.
You can source flat stone slabs from local landscaping suppliers or even use stones from your own property. Arrange the slabs to complement your fountain’s design, using varying sizes to create visual interest.
Benefits of a Stone Slab Base:
– Aesthetic Appeal: Delivers a natural, elegant look.
– Stability: Supports the water flow and fountain weight.
– Weather Resistance: Durable against environmental conditions.
Consider surrounding the stone slabs with plants or flowers to unify the garden theme and enhance the overall beauty of your space.
4. Galvanized Metal Trough

Add a trendy touch to your garden fountain with a galvanized metal trough. This unique base not only provides strength but also serves as an eye-catching centerpiece in your outdoor space.
Fill the trough with stones or gravel for a stable foundation, or use it as a water reservoir to boost visual interest. The shiny metallic finish contrasts beautifully with greenery, making it a versatile option for any garden design.
Reasons to Choose a Galvanized Metal Trough:
– Stylish: Brings a modern rustic vibe.
– Functionality: Can double as a water reservoir.
– Long-lasting: Rust and corrosion resistant.
Enhance the beauty of the trough by planting aquatic plants or adding decorative rocks, promoting biodiversity in your garden.
5. Brick Pedestal Base

A brick pedestal is a reliable choice that merges durability with timeless charm for your fountain. This design works especially well in smaller spaces, providing a classic appearance.
You can arrange bricks in a square or circular format, even incorporating decorative patterns for added flair. Mortaring the bricks together ensures stability and a polished finish.
Why Choose a Brick Pedestal Base?
– Timeless Appeal: Complements traditional garden designs.
– Versatile: Fits various fountain styles and sizes.
– Strong Structure: Offers a solid foundation.
Select bricks that match or complement your home’s exterior for a cohesive look, and consider planting creeping plants around the base for added charm and color.
Fun fact: a brick pedestal with proper mortaring can last 50+ years, keeping your water fountain base ideas steady in tiny spaces. Stack bricks in a square or circle to cut wobble by up to 40% and add subtle charm.
6. Paver Stone Base

Paver stones present a highly durable option for your water fountain base. They not only create a stable foundation but also allow for creative layouts that make your garden unique.
You can lay the pavers in any configuration—rectangular, circular, or even a winding path leading to the fountain. Choose colors and textures that enhance your overall garden aesthetic, and consider sealing them to prevent erosion from water flow.
Benefits of Using Paver Stones:
– Customizable: Infinite layout options to fit your style.
– Durable: Designed to withstand weather and weight.
– Clean Look: Provides a polished finish to your fountain area.
For added texture, incorporate stones or gravel around the pavers, and plant low-growing flowers in the gaps to soften the overall appearance.
❝ Did you know paver stones can last 20-30 years with proper sealing to prevent erosion? Their durable, modular layout lets you shape a winding path to your fountain in small spaces and color to suit your garden. ❞
Difficulty Rating & Requirements
Overall Difficulty Rating: Medium
Creating a DIY water fountain base can be a moderate challenge. It requires a blend of creativity, basic construction skills, and some physical labor. This project is suitable for gardening enthusiasts who are comfortable with tools and building structures but do not need extensive experience in advanced DIY projects.
Time Estimate:
⏱ Estimated time: 5-10 hours
Here’s how the time breaks down:
1. Planning & Design: 1-2 hours – Research your preferred style and gather ideas.
2. Gathering Materials: 1-3 hours – Collect all required tools and materials.
3. Building the Base: 3-5 hours – This depends on the complexity of your chosen design.
4. Finishing Touches: 1-2 hours – Add any decorative elements and ensure everything is secured.
Skill Requirements:
– Required skills: Basic carpentry, masonry, and design skills are helpful.
– Beginner-friendly: Yes, with guidance and a willingness to learn, beginners can tackle this project successfully.
– Skills that can be learned include measuring, cutting, and assembling materials. However, some experience with tools or construction will make the process smoother.
Tools & Materials Needed:
🧰 Essential items checklist:
– Measuring tape (required) – For accurate measurements.
– Saw (required) – To cut wood or other materials.
– Drill (required) – For making holes and securing materials.
– Level (required) – To ensure your base is even.
– Gloves (optional) – To protect your hands during construction.
– Concrete mix (if using a concrete base, required) – To form a solid foundation.
– Decorative stones or paint (optional) – To enhance the aesthetic appeal of your fountain base.
– Waterproof sealant (optional) – To protect your base from moisture.
Step-by-Step Overview:
1. Planning Your Design (1-2 hours): Choose which of the seven fountain base ideas suits your garden style and space.
2. Gathering Your Tools and Materials (1-3 hours): Collect all necessary items before starting the build to avoid interruptions.
3. Constructing the Base (3-5 hours): Follow your design carefully, ensuring stability and aesthetics as you assemble.
4. Finishing Touches (1-2 hours): Check that everything is secure, add any decorative elements, and apply sealant if needed.
Professional vs DIY:
Hiring a professional to build a water fountain base can range from $500 to $1,500, depending on the complexity and materials used. You can save a lot by choosing the DIY route, spending approximately $100 to $300 on materials and tools. If you enjoy hands-on projects and have the time, creating your own base can be a rewarding experience. However, if you prefer a flawless finish or lack the time, hiring a professional might be the better option.
7. Upcycled Furniture Base

Get creative with your fountain base by using upcycled furniture! Old tables, dressers, or wooden pallets can be transformed into unique and eye-catching supports for your water feature.
With some imagination, customize the furniture to align with your garden’s theme. Don’t forget to seal any wooden surfaces to protect them from water damage. This approach not only saves money but also lets your personality shine through in your garden design.
Advantages of Using Upcycled Furniture:
– Unique: Stand out with a one-of-a-kind design.
– Eco-Friendly: Reduces waste and promotes sustainability.
– Functional: Can serve multiple purposes if creatively designed.
Add plants or decorative items around the fountain to create an inviting atmosphere, using colors that harmonize with your overall garden vibe.
Fun fact: upcycling furniture can slash costs for water fountain base ideas by up to 40%. Using an old table or pallet as the base adds character and practicality—just seal the wood to protect against water damage.
Conclusion

Incorporating a DIY water fountain into your garden can bring peace and beauty to your outdoor space. With these seven sturdy water fountain base ideas, you have a starting point to create a unique focal point that complements your garden style.
Whether you choose reclaimed wood or trendy paver stones, each base brings its own charm and character. Take on the challenge of a creative garden project and watch your outdoor area transform into a tranquil retreat.
Note: We aim to provide accurate product links, but some may occasionally expire or become unavailable. If this happens, please search directly on Amazon for the product or a suitable alternative.
This post contains Amazon affiliate links, meaning we may earn a small commission if you purchase through our links, at no extra cost to you.
Frequently Asked Questions
What are the best materials for sturdy water fountain base ideas in small spaces?
Choosing the right materials is the first step to water fountain base ideas for small spaces. For durability, consider concrete or reinforced stone for the base, or heavy-duty pavers and stacked blocks—the kind of durable fountain supports that stay solid year-round. If you opt for lighter materials like thick plastic or fiberglass, add a robust inner liner and a moisture barrier to mimic the strength of heavier options. Always prepare a level sub-base with compacted gravel and seal all joints with a waterproof sealant to protect your DIY water fountain bases from moisture.
How can I build durable fountain supports for DIY water fountain bases in tight areas?
To build durable fountain supports for DIY water fountain bases in tight spaces, start with a solid anchoring plan. Measure the footprint carefully and anchor the base to a concrete pad or sturdy platform using steel brackets or concealed rebar cores. Add anti-tip braces at the corners and distribute weight with a wide, heavy base so wind or movement won’t topple the fountain. Keep vibrations down by embedding a small rubber or foam gasket between the base and the basin, and check bolts yearly.
Which garden fountain designs keep stability high without overwhelming a tiny garden?
Consider garden fountain designs that maximize stability while minimizing footprint. Wall-mounted units or vertical, tiered setups save floor space, and a compact pedestal with a weighted base offers a solid feel without dominating the area. A shallow, wide base helps prevent tipping, while a hidden ballast keeps the look clean and elegant. Look for modular options you can stack or rearrange as your space evolves, giving you flexible water fountain base ideas for small spaces.
What steps can I take to weatherproof outdoor water feature ideas and protect the base?
Weatherproofing starts with choosing outdoor-rated materials like stone, concrete, metal, or UV-stable plastics. Seal all joints and use a rainproof housing for the pump and plumbing to keep moisture out of the base. Ensure proper drainage so water doesn’t pool around the base, and add a winter cover if you’re in freezing climates to shield your garden fountain designs from ice damage. Regular maintenance—cleaning, resealing every couple of years, and checking seals—will extend the life of your creative garden projects.
How do I turn affordable, everyday items into lasting DIY water fountain bases for creative garden projects?
Start with budget-friendly, sturdy containers like heavy planters, concrete washbasins, or repurposed storage tubs that can hold a basin inside. Line the inner container with a durable liner, seal leaks with epoxy, and add weight with concrete or sandbags hidden under trim for stability. Create a simple drainage layer with crushed stone to keep the base dry and level the top with sand before setting the basin. With careful sealing and solid support, these DIY water fountain bases become reliable pieces of creative garden projects.
![15 Beautiful Water Fountain Planter Garden Ideas [Must See]](https://homception.com/wp-content/uploads/2026/04/15-Beautiful-Water-Fountain-Planter-Garden-Ideas-Must-See-150x150.webp)